


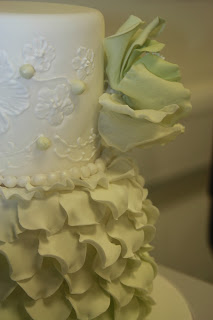
Finally I can share with you this rose petal wedding cake I made earlier this year on a cake decorating course at South Thames College in Tooting. The cake itself isn’t real – we used polystyrene dummies, so we could practice the decorating. It uses a few different techniques; I’ve already explained how to make the sugar flower that goes on top and how to use an icing bead maker.
The base of the cake looks very intricate but it’s a pretty easy technique once you know how. First cover your cake board and the bottom cake.
Colour some flower paste in a relatively dark shade – that is, I think pastel colours work best, but as you can see the colour gradually becomes paler higher up the cake, so the lower petals need to be darkest. I can’t remember exactly how much we used and it does depend on the size of your cake so I’d start with about a matchbox sized amount as you will add to it as you go with white flower paste, and you can easily make more if you need to.
Add a little white flower paste into your coloured lump and work it in, so the colour becomes a little paler. Repeat with another row of petals. Stick them on so they overlap the joins of the petals in the layer below.
Repeat again and again, adding white flower paste each time so the colour becomes paler, until the top layer is almost white with a faint blush of colour. When you get to the top, bend the petals over the top of the cake and stick down – they need to be flat as you will sit your second layer of cake on top.
For the second tier, cover your cake or dummy in white fondant. Place on top of the tier that you have finished.
Before the fondant on the cake has set hard, gently press in a patchwork cutter, or any other kind of cutter which makes a pretty pattern, so you have an indent you can emboss.
Make up some royal icing according to pack instructions and with a very small piping bag with the end snipped off (so smaller than a plastic or metal nozzle) go over the outlines of your pattern. Leave to dry.
Mix 2-3 spoonfuls of royal icing with a quarter to half teaspoon of piping gel (or piping jelly as it is sometimes known – you can buy this in cake decorating shops or on Amazon). Use a brush to apply this to the inside parts of your pattern, starting from the edges and gently brushing in to the middle.
I applied little balls of pale green fondant to match the flower petals at a few intervals around this layer.
Add the string of beads around the bottom of the top tier. Take the flower you made earlier and push a flower pick into the cake. This is a plastic holder for the flower, as you can’t put the wire directly into the cake if you are eating it (if you are using a polystyrene cake dummy that’s fine). You may need to use a little royal icing inside the flower pick to keep your flower at the angle you want.

And that’s all! The techniques are not particularly hard (other than the wired flower, that is) but it does take quite a bit of time – we spend three sessions of my evening class on this cake and that was without baking it!
I'm sharing this with Alphabakes, the blog challenge I co-host with Ros of The More Than Occasional Baker as the letter I have chosen this month is W.

I'm sharing this with Alphabakes, the blog challenge I co-host with Ros of The More Than Occasional Baker as the letter I have chosen this month is W.


0 comments:
Post a Comment